4 October 2017 – I updated the code for Swift 4 and iOS 11. You can find it here.
The camera in your iToy is a very small version of the classic camera obscura. Light comes in through a peephole and forms an inverted image on the flat surface at the opposite site of the box. Of course there is also an intricate system of tiny lenses, and the light is detected by tiny light sensitive sensors. The goal of this tutorial is to access the data from the camera at the individual pixel level.
Let’s start the work
Open a new project in Xcode and select iOS and Single View Application. Give the project a name and choose Swift as language.
First of all you need to add Privacy – Camera Usage Description to your Info.plist file. Otherwise the camera will not be allowed to be used. I added this message: “Video images from the camera are shown in one view. Processed images are shown in another view.”
Now add the two views mentioned to your storyboard, one UIView and one UIImageView. I use an iPad in landscape orientation and with some foresight, I sized the two views at 640 x 480 pixels. I positioned one in the top-left corner and one the bottom-right corner. On my iPad 2 the views overlap, but I’m alright with that. Connect the two views as outlets to the ViewController class.
Give the backgrounds of the two views a distinct color so you know which one is which. Your code should look like this now.
import UIKit

@IBOutlet weak var cameraView: UIView!
@IBOutlet weak var processedView: UIImageView!

class ViewController: UIViewController {

   override func viewDidLoad() {
      super.viewDidLoad()

cameraView.backgroundColor = UIColor.red
processedView.backgroundColor = UIColor.green
   }

}
If you build and run your app, you should see something similar to this.

Show camera image
Now we are going to use AVFoundation to do some work for us. The first task it has is pretty easy. Show us the camera image. First, you have to import the framework.
import AVFoundation
The central object of this framework is AVCaptureSession. This object controls the data flow of all inputs and outputs. In this phase we only want the back camera as input, and a preview layer as output. We set everything up in the viewDidLoad() method.
First we initialise an AVCaptureSession object. Here is our chance to set the resolution of the camera at 640 x 480 pixels. You can set the sessionPreset property to indicate the quality of the video signal. Though, there is no guarantee that it will listen to you. You can even give it a vague assignment like AVCaptureSessionPresetHigh.
override func viewDidLoad() {
   super.viewDidLoad()

   cameraView.backgroundColor = UIColor.red
   processedView.backgroundColor = UIColor.green

   let captureSession = AVCaptureSession()
   captureSession.sessionPreset = AVCaptureSessionPreset640x480
}
We are now checking all the hardware for cameras. Since the hardware on iToys is frequently changing, we use a new object called AVCaptureDeviceDiscoverySession to find the hardware we are interested in. We are looking for wide angle cameras (the iPhone 7+ also has a telephoto camera). Of course the mediatype is video. And for now, we do not commit to the front or the back camera.
let videoDeviceDiscoverySession = AVCaptureDeviceDiscoverySession(
      deviceTypes: [.builtInWideAngleCamera],
        mediaType: AVMediaTypeVideo,
         position: .unspecified)
Before we try to find the back camera, we define a property cameraDevice. Add this code below the two outlets.
var cameraDevice: AVCaptureDevice?
The device discovery will result in an array of devices, in our case only cameras. We loop through them (all two of them) and if we find the back camera. We set cameraDevice to that one. If there is no back camera, we print a message in the console.
if let deviceDiscovery = videoDeviceDiscoverySession {
   for camera in deviceDiscovery.devices as [AVCaptureDevice] {
      if camera.position == .back {
         cameraDevice = camera
      }
   }
   if cameraDevice == nil {
      print("Could not find back camera.")
   }
}
This camera now has to be added to the capture session as a AVCaptureDeviceInput. If this was somehow not possible, we can print an error message in the console.
do {
   let videoDeviceInput = try AVCaptureDeviceInput(device: cameraDevice)
   if captureSession.canAddInput(videoDeviceInput) {
      captureSession.addInput(videoDeviceInput)
   }
} catch {
   print("Could not add camera as input: \(error)")
   return
}
Next, we add a preview layer AVCaptureVideoPreviewLayer to the session. Before we do that, we define a property previewLayer. Add the code below the cameraDevice property.
var previewLayer: AVCaptureVideoPreviewLayer?
Now we initialise the preview layer object. And we set the videoGravity so that it always shows the entire image in the proper aspect-ratio. Then we set the frame of the layer to the bounds of the cameraView (remember the red rectangle?). We set the orientation to landscape. And finally, we add the preview layer as a sublayer to cameraView.
if let previewLayer = AVCaptureVideoPreviewLayer.init(session: captureSession) {
   previewLayer.videoGravity = AVLayerVideoGravityResizeAspectFill
   previewLayer.frame = cameraView.bounds
   if previewLayer.connection.isVideoOrientationSupported {
      previewLayer.connection.videoOrientation = .landscapeRight
   }
   cameraView.layer.addSublayer(previewLayer)
   } else {
   print("Could not add video preview layer.")
}
There is only one more step. We need to tell the capture session to start running. A common mistake is to miss this step and then waste an hour to see what is wrong with your code.
captureSession.startRunning()
If you build and run your app, you should see something similar to this.

Show processed image
We first need to add the protocol AVCaptureVideoDataOutputSampleBufferDelegate to our view controller class. The accompanying delegate method captureOutput() will be called every time a new image is available from the camera.
func captureOutput(_ captureOutput: AVCaptureOutput!,
      didOutputSampleBuffer sampleBuffer: CMSampleBuffer!,
      from connection: AVCaptureConnection!) {

   // some more code
}
We will add some more code to this method in a moment. The captureSession needs to know that you are adding another output. Back in the viewDidLoad() method, you create an AVCaptureVideoDataOutput object and set the format of the video signal to 32BGRA. This means that every pixel is 32 bits, with 8 bits for the Blue, Green, Red, and Alpha channel respectively (in that particular order).
let videoOutput = AVCaptureVideoDataOutput()
videoOutput.videoSettings = [kCVPixelBufferPixelFormatTypeKey as
      AnyHashable: Int(kCVPixelFormatType_32BGRA)]
We do not want to run this on the main thread. So we define a dispatch queue and attach it to the video output. Subsequently, we add the video output to the capture session.
let sessionQueue = DispatchQueue(label: "VideoQueue",
   attributes: [], target: nil)
videoOutput.setSampleBufferDelegate(self, queue: sessionQueue)
if captureSession.canAddOutput(videoOutput) {
   captureSession.addOutput(videoOutput)
} else {
   print("Could not add video data as output.")
}
Temporarily add these lines to the captureOutput() method.
let now = Date()
print(now.timeIntervalSince1970)
If you build and run your app you can see that captureOutput() is called regularly.
Now we get the highlight of this tutorial. We are going to access the pixels. Add the next block of code below to the captureOuput() method. Let’s go through it step by step. Every time there is new image from the camera, this method gives you a reference to a CMSampleBuffer object. The first line of code converts this into a CVImageBuffer. Then we lock the base address of the buffer which means that nothing happens to the memory while we read and write pixel data. Next, we ask the buffer for some image data characteristics like width, height, bits per component, and bytes per row. Now we ask it for its base address, basically a pointer to the first pixel. Next it is converted to a byte buffer, so we can access the 8 bit component of the 32 bit pixel data.
We are getting really close to our goal. We define two loops so that we can access all pixels by their row and column. The index converts the i and j into the right memory address. And now we get the 8 bit value of the blue, green, and red components of a pixel.
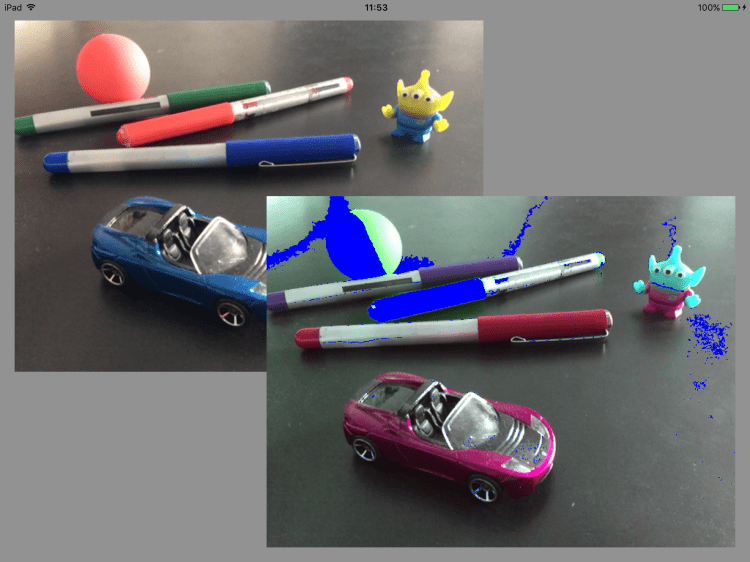
To prove that we can manipulate the values, I have conjured up an image processing example. If a pixel is very red, then I turn it into bright blue. For all the other pixels, I switch the color components around: blue to green, green to red, and red to blue.
In the remaining lines of code, a colourspace and context is defined for a CGImage. The processed image data is stored in that CGImage, converted to a UIImage, and finally shown in processView (remember the green rectangle?).
let imageBuffer = CMSampleBufferGetImageBuffer(sampleBuffer)!
CVPixelBufferLockBaseAddress(imageBuffer, CVPixelBufferLockFlags(rawValue: CVOptionFlags(0)))

 let width = CVPixelBufferGetWidth(imageBuffer)
 let height = CVPixelBufferGetHeight(imageBuffer)
 let bitsPerComponent = 8
 let bytesPerRow = CVPixelBufferGetBytesPerRow(imageBuffer)
let baseAddress = CVPixelBufferGetBaseAddress(imageBuffer)!
 let byteBuffer = baseAddress.assumingMemoryBound(to: UInt8.self)

 for j in 0..<height {
    for i in 0..<width {
       let index = (j * width + i) * 4
       let b = byteBuffer[index]
       let g = byteBuffer[index+1]
       let r = byteBuffer[index+2]
        //let a = byteBuffer[index+3]

       if r > UInt8(128) && g < UInt8(128) {
           byteBuffer[index] = UInt8(255)
           byteBuffer[index+1] = UInt8(0)
           byteBuffer[index+2] = UInt8(0)
       } else {
           byteBuffer[index] = g
           byteBuffer[index+1] = r
           byteBuffer[index+2] = b
       }
    }
 }

 let colorSpace = CGColorSpaceCreateDeviceRGB()
 let bitmapInfo = CGImageAlphaInfo.premultipliedFirst.rawValue |
        CGBitmapInfo.byteOrder32Little.rawValue
 let newContext = CGContext(data: baseAddress, width: width, height: height, bitsPerComponent: bitsPerComponent, bytesPerRow: bytesPerRow, space: colorSpace, bitmapInfo: bitmapInfo)
 if let context = newContext {
    let cameraFrame = context.makeImage()
    DispatchQueue.main.async {
       self.processedView.image = UIImage(cgImage: cameraFrame!)
    }
 }

 CVPixelBufferUnlockBaseAddress(imageBuffer, CVPixelBufferLockFlags(rawValue: CVOptionFlags(0)))
If you build and run your app, you should see something similar to this.
What can you do next?
Now that you have access to all the individual pixel values of every image that comes out of you camera, you can do whatever you want. You can implement any image processing or computer vision algorithms that can imagine.
You can find the code here.
You can find more tutorials here.
If you have any questions or suggestions, you can contact me here.
